Workshop: Beeswax wraps
How to make reusable beewax wraps
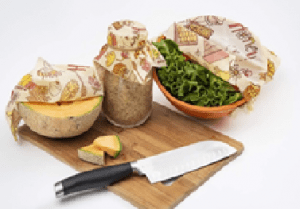
Reusable beeswax wraps can be reused hundreds of times and are even compostable.
Reusable beeswax wraps can be reused hundreds of times and are even compostable.
At Bees4life we raise awareness. Not only about the problem of the extinction of bees and pollinators, but also about other major problems of humanity. One of these very urgent problems is the plastic pollution.
In this workshop we teach how to avoid the use of wrapping plastic (also called plastic foil) by proposing a compelling alternative: home-made beeswax wraps.
Let’s get started!
What do we need?
- PURE beeswax
- 100% cotton fabric, second hand fabric if somehow
- possible
- Cotton scissors
- Ruler & pencil
- Knife or grater
- Baking paper
- Iron
- Underlay like cardboard to protect the table (very important!)
Step-by-step instructions to make beeswax wraps
1. Get pure beeswax from a trusted beekeeper.
2. Get 100% cotton fabric. (Second hand quality if somehow possible, you can also use old T-Shirts.)
3. Wash, dry and iron the fabric.
4. Cut the fabric into pieces. Sizes used in the workshop are: 10×10 cm, 15×15 cm, 25×25 cm.
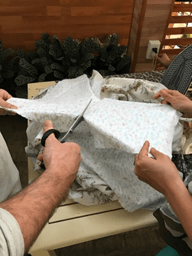
Cut the cotton fabric with cotton scissors.
5. Grate the beeswax by using a grater or a knife
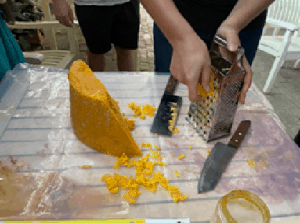
Grating the beeswax. You can also use a knife and save your grater 😉
6. Take some baking paper (at least double the size of the fabric) and place the fabric on top of baking paper. If your fabric is one-sided, place the patterned side facedown.
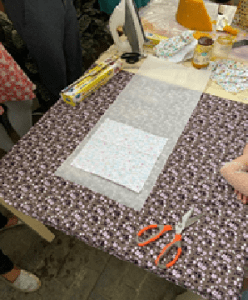
Placing the fabric on the baking paper
7. Evenly distribute a liberal amount of beeswax all over the fabric. Add more wax if necessary and make sure you get wax near the edges too.
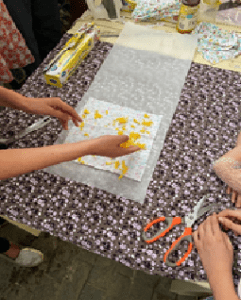
Put the beeswax flakes on the fabric.
8. Cover the fabric with the beeswax with the baking paper and iron until the wax is evenly distributed.
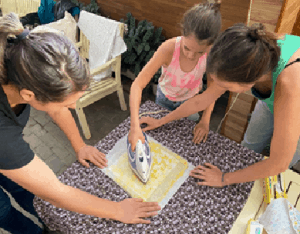
Make sure that children are always accompanied by their parents during the workshop, since we work with irons.
9. Lift it up and wait for about a minute until the wax dries.
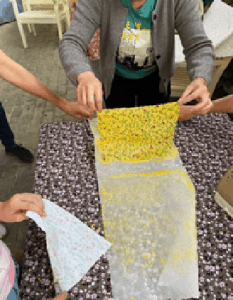
Almost done! Lift up your new beeswax wrap and let it dry for less than a minute.
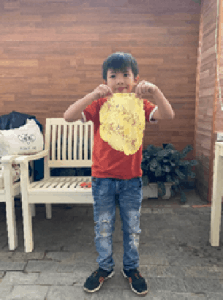
Yay!
10. Save the excess wax on the baking paper for the next time 🙂 .
11. Use the reusable beeswax wraps in your daily routine in order to reduce plastic.
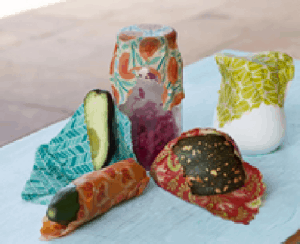
You can cover literally anything and save it for the next day. Half-cut fruit and vegetables, any bowl, glass or jar… enjoy!
How to use beeswax wraps
You can use the wraps to cover any food leftover, fruits or vegetables that you want to save for the next day, and even shop for sweets and bakery items. Don’t use it for raw meat and fish!
Use the wrap by molding it around food products, containers, or bowls. Place the wrap around the object and heat it up with the palms of your hands. In this way, the beeswax wrap takes the same shape as the item. The warmth of one’s hands melts the beeswax, softening the wrap enough to create a seal around containers and food products.
To wash the beeswax wraps, rinse the wrap with cool or lukewarm water and eco-friendly dish soap. You can use a cloth or sponge to wipe them down, then rinse them off.
Beeswax wraps usually lose their grip after one year. Then you can compost them since they consist of natural materials.
And now? Get inspired by